搞一份内核源码, 并尝试调试一个拓展内核功能的补丁 Kernel-Mode-Linux; 对于该模块的调试与分析见后续博文< 启用Kernel Model Linux>
Linux内核编译
这里使用的是Linux4.4.12(4.0.*, 3.1*, 2.6.*系列也有尝试过), 并且还需要打上PREEMPT_RT实时内核补丁, 借鉴于Github KML仓库:
 1# 0. Clone this repository
 2git clone git@github.com:sonicyang/KML.git
 3
 4# 1. Clone Linux 4.4.12
 5git clone -b v4.4.12 --depth 1 git://git.kernel.org/pub/scm/linux/kernel/git/stable/linux.git
 6
 7# You will get a copy of Linux 4.4.12 source in directory linux
 8
 9# 2. Download PREEMPT_RT patch
10wget https://cdn.kernel.org/pub/linux/kernel/projects/rt/4.4/older/patch-4.4.12-rt18.patch.xz
11
12# You will get a file patch-4.4.12-rt18.patch.xz
13
14# 3. Apply the PREEMPT_RT patch
15cd linux
16xzcat ../patch-4.4.12-rt18.patch.xz | patch -p1
17
18# You will have a modified Linux 4.4.12 source with PREEMPT_RT, now.
19
20# 4. Commit the the changes at once (Otherwise, git am will fail)
21git add .
22git commit -m "Apply PREEMPT_RT"
23
24# Now you should have a clean git repository without unstaged changes
25
26# 5. Apply these 2 patches
27cp ../KML/*.patch .
28git am *.patch
29
30# You are good to go
31# Compile the kernel then you should be able to use KML
PREEMPT_RT补丁
关于该内核补丁, 是为了将Linux内核拓展为一个实时的操作系统.
常规意义上来讲,Linux并不算是一个实时操作系统,它并没有很强的实时处理能力,但是如果加入了PREEMTP_RT补丁后,它可以成为一个实时操作系统。PREEMTP_RT补丁并不属于内核主线,不同内核版本都有对应的PREEMTP_RT补丁,它是由单独项目维护的(Real-Time Linux Project)。我们需要先下载并打上PREEMTP_RT补丁,然后重新配置内核的实时抢占模型,重新编译后才能成为一个实时系统。经过打上补丁,PREEMTP_RT Linux是可以达到硬实时需求的。
原文链接:https://blog.csdn.net/rikeyone/article/details/94555165
编译内核
首先进行默认的配置(直接):make defconfig也可以, 因为本机的架构就是x86_64
1export ARCH=x86
2make x86_64_defconfig随后通过make menuconfig指定几个内核选项, 启用内核debug, 关闭地址随机化.
1Kernel hacking  --->
2    [*] Kernel debugging
3    Compile-time checks and compiler options  --->
4        [*] Compile the kernel with debug info
5        [*]   Provide GDB scripts for kernel debugging
6Processor type and features ---->
7    [] Randomize the address of the kernel image (KASLR)
全速编译内核: make -j `nproc` , 此时的环境是Linux-4.4.12, gcc-12.2.1
PIC报错
然而会报错:
1cc1: error: code model kernel does not support PIC mode在Makefile中添加gcc编译参数-fno-pie, 在
Kernel doesn’t support PIC mode for compiling? - Ask Ubuntu中给出了原因说明, 好像是由于新版的gcc(确切地说是gcc6及以后, 尽管gcc5好像也有这个bug)默认会使用pie技术, 但是老版的内核并不支持, 因而在Makefile中手动关闭:
1KBUILD_CFLAGS   := -Wall -Wundef -Wstrict-prototypes -Wno-trigraphs \
2		   -fno-strict-aliasing -fno-common \
3		   -Werror-implicit-function-declaration \
4		   -Wno-format-security \
5		   -std=gnu89 -fno-pie
或者也有一些前人整理好了参数修改的方式, 通过打Makefile补丁的方式也可以解决, 不过本质异曲同工, 都是修改Makefile的FLAG参数即可.
补丁: [xenial/master-next 1/1] UBUNTU: SAUCE: (no-up) disable -pie when gcc has it enabled by default
这里再补充交代一点关于pie选项的, 可以惭愧地引入之前 博客的一段内容:
content/posts/ULK-进程.md
1341:之前为了对
$1f语法做测试,我写了非常挫的一些代码。。不加任何选项的编译下述会产生错误,加上-no-pie后才可以成功编译,这个错误的产生大概是因为$1f的原因。。 Options for Code Generation Conventions 查阅GCC官方文档学习一下-fpic, -fPIC, -fpie, -fPIE这四个选项的意思。-fpic会产生position-independent code(PIC),通常用于共享库中。在该选项下,常量通过一个全局偏移表(global offset table, GOT)来访问,受到机器的限制,当该偏移表过大时,可以使用-fPIC选项,该选项允许更大的偏移表;-fpie, -fPIE是类似的功能,不过该选项只会产生用于链接为可知性文件的代码。1343:g++默认会加入
pie选项,这产生了错误,因而加上-no-pie通知g++才能成功编译下述代码。。。具体原因不深入考究(懒),只能猜测是因为$1f指向了一段代码的地址,那么用pie的相对地址可能就会有一点问题?emm也留坑
修改完PIC后, 可以编译出一个内核镜像, 将编译出来的arch/x86_64/boot/bzImage拿出来找个合适的位置放起来.
initrd制作
为什么需要initrd?
Linux启动阶段, boot loader加载完内核文件vmlinuz之后, 便开始挂载磁盘根文件系统. 挂载操作需要磁盘驱动, 所以挂载前要先加载驱动. 但是驱动位于/lib/modules, 不挂载磁盘就访问不到, 形成了一个死循环. initramfs根文件系统就可以解决这个问题, 其中包含必要的设备驱动和工具, boot loader会加载initramfs到内存中, 内核将其挂载到根目录, 然后运行/init初始化脚本, 去挂载真正的磁盘根文件系统.
HelloKernel制作
如何实现一个简单的initrd(initial ramdisk)呢? 可以参考
编译Linux内核在qemu中启动, 补充安装一个cpio(制作initrd根目录要求), 编译一个hello world作为initrd…
1$ gcc -static -o hellohello.c
2$ echo helloworld | cpio -o --format=newc > rootfs
3$ qemu-system-x86_64 -kernel ./bzImage -initrd ./rootfs \
4	-append "root=/dev/ram rdinit=/hello"
无法解压内核镜像
运行后发现qemu模拟器使用该内核无法进入, 一直闪烁并提示Decompressing Linux... Parsing ELF..., 随后就卡死在这一步. 具体问题描述与解决方案可以参见:
QEMU cannot boot locally built Linux kernel anymore
问题的原因在于:
binutils 2.31 has changed the defaults of the linker (ld) such that the default for max-page-size was decreased from 2MiB to 4kiB. This change breaks the x86_64 kernel, unless said commit is applied.
打上补丁: kernel/git/tip/tip.git - Unnamed repository; edit this file ‘description’ to name the repository., 再次重新编译内核, 即可运行.
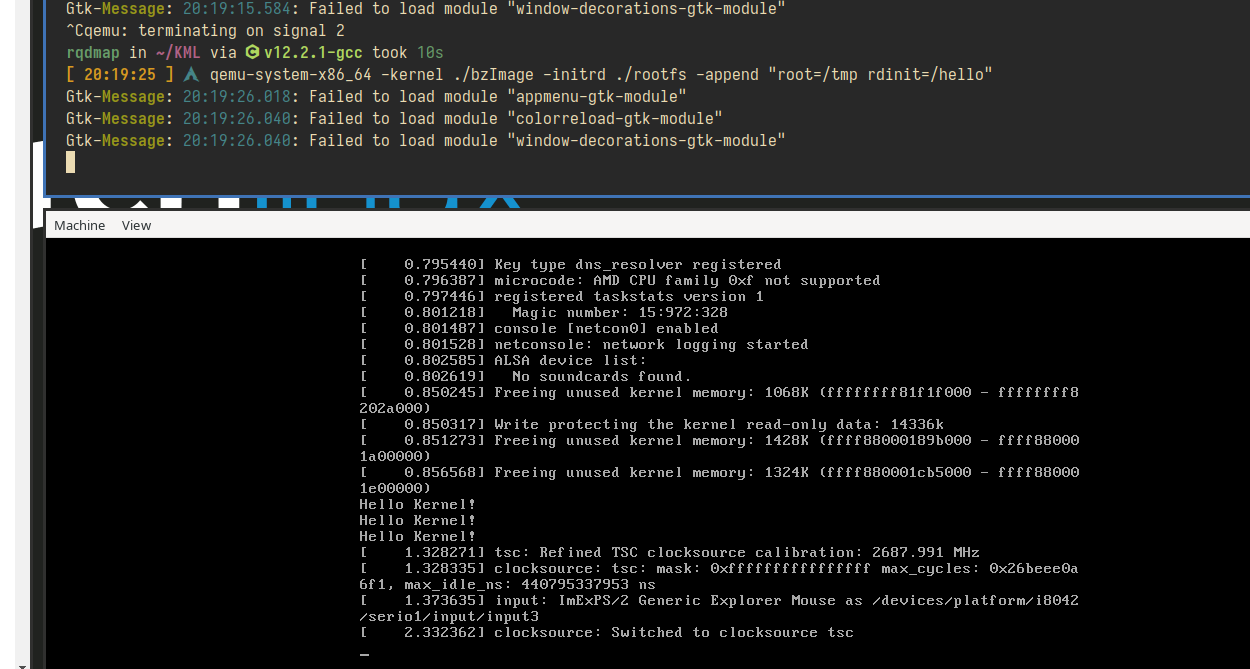
发现可以能加载之前的hello kernel程序. 非常的妙, 这确实是可以作为init程序运行的, 不过没有什么卵用罢了qaq..
Busybox制作
真正制作一个initrd, 一般使用
busybox. 该软件也需要编译, 首先make defconfig加载默认配置, 随后开启几个选项:
 1-> Settings
 2 --- Support --long-options
 3  [\*] Don't use /usr	#不要生成usr目录	(CONFIG_INSTALL_NO_USR)
 4 --- Build Options
 5  [\*] Build static binary (no shared libs)  #进行静态编译	(CONFIG_STATIC)
 6 --- Installation Options ("make install" behavior)
 7  What kind of applet links to install (<choice> [=y])
 8   (X) as soft-links	(CONFIG_INSTALL_APPLET_SYMLINKS)
 9 --- Library Tuning
10  [\*]   Query cursor position from terminal	(CONFIG_FEATURE_EDITING_ASK_TERMINAL)
选项参考: [busybox]用busybox做一个rootfs.
随即尝试编译, 报错:
 1...
 2...
 3  LINK    busybox_unstripped
 4Static linking against glibc, can't use --gc-sections
 5Trying libraries: crypt m resolv rt
 6/data/rqdmap/Codes/intership/KML/busybox-1.33.2/scripts/trylink: line 40:
 7busybox_unstripped.out: Permission denied
 8/data/rqdmap/Codes/intership/KML/busybox-1.33.2/scripts/trylink: line 41:
 9busybox_unstripped.out: Permission denied
10/data/rqdmap/Codes/intership/KML/busybox-1.33.2/scripts/trylink: line 42:
11busybox_unstripped.out: Permission denied
12/data/rqdmap/Codes/intership/KML/busybox-1.33.2/scripts/trylink: line 44:
13busybox_unstripped.out: Permission denied
14Failed: -Wl,--start-group  -lcrypt -lm -lresolv -lrt  -Wl,--end-group
15Output of:
16gcc -malign-data=abi -Wall -Wshadow -Wwrite-strings -Wundef -Wstrict-prototypes
17-Wunused -Wunused-parameter -Wunused-function -Wunused-value
18-Wmissing-prototypes -Wmissing-declarations -Wno-format-security
19-Wdeclaration-after-statement -Wold-style-definition -finline-limit=0
20-fno-builtin-strlen -fomit-frame-pointer -ffunction-sections -fdata-sections
21-fno-guess-branch-probability -funsigned-char -static-libgcc
22-falign-functions=1 -falign-jumps=1 -falign-labels=1 -falign-loops=1
23-fno-unwind-tables -fno-asynchronous-unwind-tables -fno-builtin-printf -Os
24-static -o busybox_unstripped -Wl,--sort-common -Wl,--sort-section,alignment
25-Wl,--start-group applets/built-in.o archival/lib.a archival/libarchive/lib.a
26console-tools/lib.a coreutils/lib.a coreutils/libcoreutils/lib.a
27debianutils/lib.a klibc-utils/lib.a e2fsprogs/lib.a editors/lib.a
28findutils/lib.a init/lib.a libbb/lib.a libpwdgrp/lib.a loginutils/lib.a
29mailutils/lib.a miscutils/lib.a modutils/lib.a networking/lib.a
30networking/libiproute/lib.a networking/udhcp/lib.a printutils/lib.a
31procps/lib.a runit/lib.a selinux/lib.a shell/lib.a sysklogd/lib.a
32util-linux/lib.a util-linux/volume_id/lib.a archival/built-in.o
33archival/libarchive/built-in.o console-tools/built-in.o coreutils/built-in.o
34coreutils/libcoreutils/built-in.o debianutils/built-in.o klibc-utils/built-in.o
35e2fsprogs/built-in.o editors/built-in.o findutils/built-in.o init/built-in.o
36libbb/built-in.o libpwdgrp/built-in.o loginutils/built-in.o
37mailutils/built-in.o miscutils/built-in.o modutils/built-in.o
38networking/built-in.o networking/libiproute/built-in.o
39networking/udhcp/built-in.o printutils/built-in.o procps/built-in.o
40runit/built-in.o selinux/built-in.o shell/built-in.o sysklogd/built-in.o
41util-linux/built-in.o util-linux/volume_id/built-in.o -Wl,--end-group
42-Wl,--start-group -lcrypt -lm -lresolv -lrt -Wl,--end-group
43==========
44/usr/bin/ld: cannot find -lcrypt: No such file or directory
45collect2: error: ld returned 1 exit status
46Note: if build needs additional libraries, put them in CONFIG_EXTRA_LDLIBS.
47Example: CONFIG_EXTRA_LDLIBS="pthread dl tirpc audit pam"
48make: *** [Makefile:718: busybox_unstripped] Error 1
非常的坑, 据说是因为gcc在处理静态链接库时不是很好.. 改用musl后成功, 参考: [SOLVED] Static building of busybox fails, after update gcc/glibc?
什么是musl?
musl, 一种C标准函式库, 主要使用于以Linux内核为主的作业系统上, 目标为嵌入式系统与行动装置, 采用MIT许可证释出. 作者为瑞奇·费尔克(Rich Felker). 开发此库的目的是写一份干净、高效、符合标准的C标准库. [3]
Musl是从零开始设计的. 一是希望让静态链接更高效;二是现有的C标准库在一些极端条件下表现很糟糕, 竞态条件、资源不足时常常会出问题, 而Musl试图避免它们来达到较高的实时强健性. [3]Musl的动态运行时只有一个文件, 有稳定的ABI, 因此可以实现无竞态的版本升级. 对静态链接的支持也让可移植单文件应用部署成为可能, 而且不会使文件体积膨胀很多.
Musl声称与POSIX 2008标准和C11标准兼容, [4]还实现了多数广泛使用但非标准的Linux、BSD和glibc函数.
如何使用musl呢? 可以参考Busybox Package的PKGBUILD:
Arch Linux - busybox 1.34.1-1 (x86_64), 其中提到make CC=musl-gcc, 意味着通过CC参数即可修改默认的编译器.
那么首先通过pacman安装musl和kernel-headers-musl依赖, 再依次运行make CC=musl-gcc和make CC=musl-gcc install即可安装initrd!
默认生成的目录在busybox下的_install, 拿到外面一个合适的地方重命名为rootfs.
随后的步骤参考 QEMU + Busybox 模拟 Linux 内核环境, 大致为:
1pushd rootfs
2
3mkdir dev proc sys
4sudo cp -a /dev/{null,console,tty,tty1,tty2,tty3,tty4} dev/
5rm linuxrc
6touch init
7
8cat > init << EOF
9#!/bin/busybox sh
10mount -t proc none /proc
11mount -t sysfs none /sys
12exec /sbin/init
13EOF
14
15chmod a+x init
16find . -print0 | cpio --null -ov --format=newc | gzip -9 > ../rootfs.cpio.gz
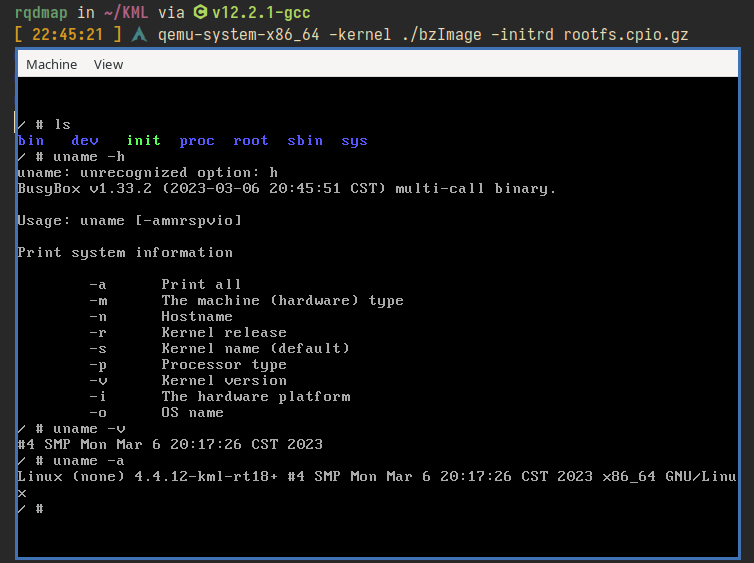
17popdQEMU运行
万事俱备, 最后运行qemu即可:
1qemu-system-x86_64 -kernel ./bzImage -initrd rootfs.cpio.gz长这样:
使用GDB对内核调试
如果要使用GDB对内核进行调试, 一定要记得加上Compile the kernel with debug info编译选项, 不然无法在GDB中读出相应的符号了, 参考
system building - How to compile the kernel with debug symbols? - Server Fault:
随后修改qemu启动指令为:
1qemu-system-x86_64 -kernel ./bzImage -initrd rootfs.cpio.gz \
2	-append "nokaslr console=ttyS0" -nographic -S -s
其中:
-
-s 等价于 -gdb tcp::1234 表示监听 1234 端口,用于 gdb 连接
-
-S 表示加载后立即暂停,等待调试指令。不设置这个选项内核会直接执行
为了方便GDB的启动, 在工作目录下创建一个.gdbinit文件, 填入:
1file linux-3.18.140/vmlinux
2target remote:1234
这样, 运行完QEMU后再运行GDB即可进行调试!